This Aston Martin DB9 came in requiring a seat restoration
The drivers seat was in a bad way with plenty of wear, cracking and colour loss on the bolster.
This DB9 had contrasting stitching so this had to be preserved so no colour went onto the black stitching at all.


This Aston Martin seat was all original and the client didn't want any leather replacing at all, they just wanted the seat to be like brand new again and brought back to its former glory.
This drivers seat on this DB9 was very dry and badly worn.
We started off by cleaning the seat first of all so we could get an exact colour match carried out, so that the repair was a perfect one and no one would ever know the colour on the drivers seat had be restored.
Once the seat had been cleaned the prep work began, you have start first of all by removing the old surface colour to enable the new leather colour to bond into the leather and then to surface coat the seat.
We used the leather prep, a fine red pad and section of fabric placed within the fine red pad so that it could hold the fluid more than what the pad would do. the red pad and rubbed over the surface to remove the old colour, this does sound rough and harsh, but it isn't and it works the prep in it begins to remove the old surface colour.
This process will also help soften the leather greatly as its the surface colour that has dried out and gone hard rather than the leather in most cases, sometimes it is the leather that's also gone hard and brittle.
Here are some pictures take in the same lighting conditions as the ones above.


Once all the colour had been removed we began with the colouring process, this is at first wiped on and at this stage its looks rather messy all we are trying to do now is to get the colour to soak into the leather to re dye this.
Once this colour is dry you can then sponge on i a stippling motion another coating, normally at this stage the colour covers all the area fully.
Once that is done and you've dried it using hair drier you can apply the final coatings, we masked up all the contrast stitching and used the mouth atomiser to thinly spray on an even coating of colour to perfect the seat colour restoration.
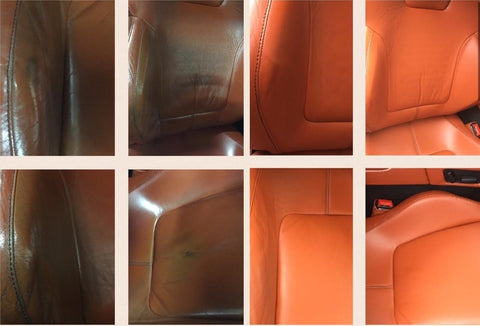
Here are pictures taken in day light outside.


This shows you the seat before and after all side by side